Sunday, September 26, 2010

Part 2 of 3 (LAB) - Forest Active Directory & Exchange Migration

Exchange Migration, Exchange Server Migration - (Retaining SID History)

The below lab follows on from "Part 1 Active Directory Migration ADMT". All user accounts have now been migrated from source domain Silverwater.local the to destination Rhodes.local.

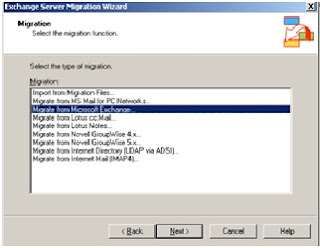
This part of the migration focuses upon the mailbox migration. For this step we plan to use the Microsoft Exchange Server Migration Wizard (MAILMIG.EXE). Using this wizard simplifies the migration and ensures each migrated user receives their full mailbox. The alternative approach would be to export \ import PST file from source to destination Exchange Servers, which would be a time consuming and without scripting a manual process.


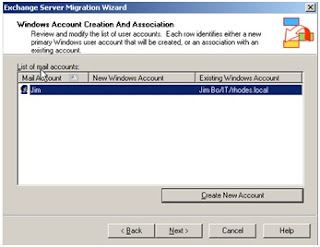
Earlier in the migration chose to retained the users SID,  doing so now allows us align the source mailbox with the destination user account across the separate forests. Note if the user SID was not migrated with the user acount across the forests then this process would not allow us the link the mailbox with the user account (as shown in step 5), therefore the only option would be leverage the Exmerg tool.

You can only migrate mailboxes from the source server if the source server is not part of the same Exchange 2003 organization as the server that is running the Migration Wizard.

What is the difference between Intraorganizational- and Interorganizational Migration?

Intraorganizational migration: The mailboxes will be migrated between Exchange Servers in ONE Exchange Organization.

Interorganizational migration: The mailboxes will be migrated between Exchange Servers in DIFFERENT Exchange Organizations.

The below lists the steps involved in migrating mailboxes from Silverwater.local to Rhode.local.au

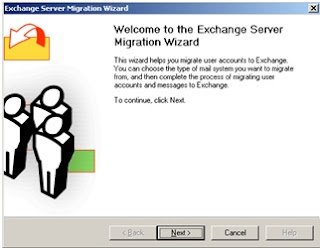
You can start the Migration Wizard by clicking Start – Microsoft Exchange – Deployment – Migration Wizard (MAILMIG.EXE).

1. Run the Exchange Server Migration Wizard from the Rhodes Exchange Server

2. The Migration Wizard supports the migration from several different mail systems, for this migration we will chose migration from Exchange to Exchange
3. Select the Information Store on the destination exchange server (rhodes)
 
4. Select the (source) accounts that are to be migrated
5. Select the (destination) user account we migrating. Th will be and existing account migrated using the ADMT. By retaining SID information will be able to migrate to an existing account.
The next step now is to ensure when the user login into Rhodes.local they receive the newly migrated mailbox.

Saturday, September 25, 2010

Part 1 of 3 (LAB) - Forest Active Directory & Exchange Migration

Active Directory Migration ADMT (Retaining User SID)

The goal of this blog is the detail the lab I created to help me setup and test the Microsoft ADMT (Active Directory Migration Tool) and then alignn this with the Microsoft Exchange Migration wizard.  As shown in the below digram we have 2 separate domains Rhode.local and Silverwater.local, the aim is to migrate all user accounts followed by thier mailboxes.


AD Forests
Both domain have a single Domain Controller and Exchange Servers. Secondary DNS zones have been configured for each domain and a 2-way Forest Trust is in place.

The migration is seperated into 3 stages. 

1. How to migrate users using ADMT and retain user SID's?

2. How to migrate mailboxes and align them to the migrated accounts?

3. How to change user clients outlook profile to the migrated mailboxes?

This blog will focus on migrating all user accounts using the Microsoft Active Directory Migration tool (ADMT). ADMT provides an effective tool that simplifies the process of migrating users, computers, and groups to new domain.

We will retain users SID's during the migration, this is important for phase 2 mailboxes migration. This will ensure once we come to the mailbox migration we can associate the mailboxes with the migrated user IDs.

Security Identifier (commonly abbreviated SID) is a unique name ) which is assigned by a Windows Domain controller during the log on process that is used to identify a subject, such as a user or a group of users in a network of NT/2000 systems.

The following steps must  be configured before installing ADMT:
a)     DNS must be configured on both Domain controllers. This step is critical in getting the trust to work. On both opposing  domains a new secondary DNS zone will be added for each domain name.
b)     Once the secondary zones have been added, the “Zone Transfer” setting must be changed to allow replication of zones to each domain. Simple allow unrestricted zone transfers as both domains are considered trusted.
c)      Create 2-WAY Transitive trust been both domains.  
Once the infrastructure is complete, the following steps are used to migrate user accounts across the forest.

 1. Run ADMT from Rhodes AD1


 2.  Select the users to migrate


 3.  Retain SID History


At this point all users from the Silverwater Domain  have been imported in the Rhodes domain whilst retaining their SID history.


The next step is to migrate the mailboxes....

References:

Active Directory Migration Tool (ADMT) v3.0 Migration Guide

http://www.microsoft.com/downloads/details.aspx?familyid=B1F816C0-4E2B-4E5D-B256-1AC304062367&displaylang=en

Friday, September 17, 2010

EtherChannel with VMware ESXi 4.1


EtherChannel allows multiple physical Ethernet links to combine into one logical channel, which allows the links in the channel to share traffic load, as well as redundancy in the event that one or more links in the channel fail.
When setting an EtherChannel mode in a Cisco switch, your choices are ‘on’, ‘off’, ‘active’, ‘passive’, ‘desirable’ or ‘auto’. Each mode setting forces a particular negotiation protocol and behaviour as such:

Mode
Negotiation
Operation
on
None
Enables EtherChannel, does not negotiate
off
None
Disables EtherChannel
active
LACP
Initiates negotiation to enable EtherChannel
passive
LACP
Responds to received negotiation requests
desirable
PAgP
Initiates negotiation to enable EtherChannel
auto
PAgP
Responds to received negotiation requests


LACP is IEEE, PAGP is Cisco-proprietary. If it is ON then it doesn't negotiate either protocol.   So if you have a non-Cisco switch and you want to run etherchannel from it, you have to either run LACP or set it to "on".
ESX does not support PAgP or LACP and therefore you need to set Etherchannel to the mode "on".
The following is a ESX Server and Cisco switch sample topology and configuration.
Note:  When stacked the Cisco 3750 switches act as one logical switch.  Each NIC port should be redundantly connected to each switch to support switch fail over.

Cisco 3750 Stacked Switches

interface Port-channel 1
 description Link aggregate for “ESX Server"
 switchport trunk encapsulation dot1q
 switchport mode trunk
switchport trunk nonegotiate
!
interface GigabitEthernet 1/1/1
switchport trunk encapsulation dot1q
switchport mode trunk
switchport trunk nonegotiate
channel-group 1 mode on
!
interface GigabitEthernet 2/1/1
switchport trunk encapsulation dot1q
switchport mode trunk
switchport trunk nonegotiate
channel-group 1 mode on
!

To verify a switches current load balancing mechanism, Run the following command
Switch# show etherchannel load-balance
EtherChannel Load-Balancing Configuration:
src-dst-ip
 To configured load-balancing algorithm, the following commands in global configuration mode:
port-channel load-balance src-dst-ip
 To configured load-balancing in the vSwitch see the below:
vSwitch Configuration
In the above example the EtherChanel has been configured as trunk port.  This allows for multiple VLANs to be trunked to the vSwitch.